
Home Insulation from Attic to Basement: A Full-Picture Overview
Understand R-values, insulation types, and where heat loss actually happens in a typical home — without wading through contractor jargon.
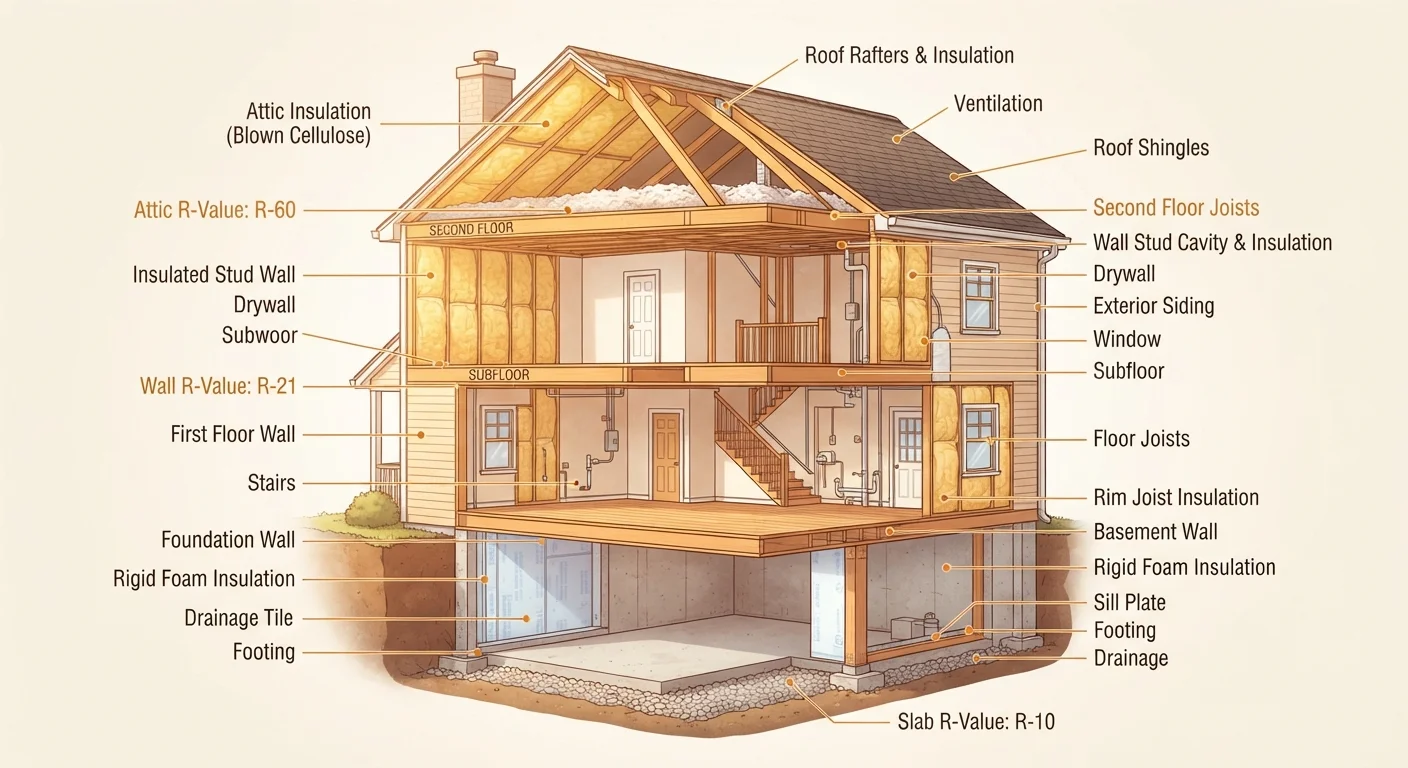
Photo: FaqsDrive.com | Smart Way To Search editorial
—— In This Article
Key Takeaways
- R-value measures thermal resistance — higher numbers mean better insulation performance.
- The attic is typically the single highest-impact area to insulate in most American homes.
- Air sealing and insulation work together; adding insulation without sealing gaps reduces effectiveness.
- Different insulation materials suit different locations and budgets.
- Some insulation work is DIY-friendly; electrical, gas, or structural work nearby always requires a licensed professional.
Why Insulation Is a Whole-House Project
Most homeowners think about insulation only when a heating or cooling bill arrives and feels too high. But insulation isn't a single product you install in one spot — it's a system that spans your attic, exterior walls, floors, and basement or crawl space. A gap in any one of those areas lets conditioned air escape and outdoor temperatures creep in.
Think of your home's thermal envelope — the boundary separating conditioned indoor air from the outside — as a jacket. A jacket with holes in the elbows still warms you somewhat, but far less efficiently than one that's fully intact. Improving insulation across the whole envelope is what delivers real, year-round comfort and lower energy bills.
If you're just getting started with home improvement projects, see our beginner's guide to first DIY projects to understand how to plan and scope work safely before you begin.
Start With an Energy Audit
Before spending money on insulation materials, consider scheduling a home energy audit. A professional auditor uses diagnostic tools to show exactly where your home is losing energy, so you can prioritize improvements that will deliver the greatest return rather than guessing.
Understanding R-Values
R-value is the standard measure of an insulation material's resistance to heat flow. The higher the R-value, the more effectively the material slows heat transfer. R-values are additive — two layers of R-15 batts together provide R-30 performance.
The U.S. Department of Energy publishes recommended R-values by climate zone. Homes in colder northern climates generally need higher R-values (R-49 to R-60 in attics) than homes in warmer southern regions (R-30 to R-38). Your local building department or energy office can tell you the recommendations for your specific zone.
~25–35%
Heat lost through attic and ceiling
Estimate from the U.S. Department of Energy's guidance on home heat loss distribution.
Up to 30%
Energy savings from air sealing and insulation
The U.S. Department of Energy estimates properly sealing and insulating can reduce heating and cooling costs by up to 30%.
One important note: R-value only measures conductive heat resistance. It does not account for air leakage, which is a separate — and equally important — factor. That's why sealing air gaps with caulk or weatherstripping is always recommended alongside any insulation upgrade.
Common Insulation Types Explained
Insulation comes in several forms, each with different applications, costs, and installation requirements:
- Fiberglass batts — Flexible blankets designed to fit between standard stud and joist spaces. Widely available and straightforward to install in open wall cavities or attic floors.
- Blown-in (loose-fill) fiberglass or cellulose — Blown in using a machine, this type fills irregular spaces and is commonly used to top up attic insulation. Cellulose is made largely from recycled paper and is a popular environmentally conscious choice.
- Rigid foam board — Dense panels used on basement walls, exterior sheathing, or under slabs. Offers high R-value per inch and also acts as a vapor barrier in some applications.
- Spray foam — Applied as a liquid that expands and hardens. Closed-cell spray foam provides both insulation and a strong air and moisture barrier. Open-cell spray foam offers a lower R-value per inch but better soundproofing. Spray foam installation should typically be performed by a licensed contractor due to the chemicals involved and the precision required.
- Mineral wool (rock wool) — Made from volcanic rock or industrial slag, mineral wool batts are fire-resistant and moisture-resistant, making them useful in basements and around mechanical areas.
When installing fiberglass batts, avoid compressing them to fit. A compressed batt loses R-value proportionally — a 3.5-inch cavity needs a batt designed for exactly that depth.
R-value ratings are based on insulation at its full, uncompressed thickness. Compressing the material reduces the air pockets that provide resistance to heat flow.
In the attic, seal all penetrations with caulk or low-expansion spray foam before blowing in loose-fill insulation. Doing it after means moving material to find every gap.
Air sealing is most effective when done on the air barrier layer itself. Insulation on top of unsealed bypasses still allows significant convective heat loss through the gaps.
Where Heat Loss Actually Happens
Understanding heat loss locations helps you prioritize spending. According to the U.S. Department of Energy, in a typical home:
- The ceiling and attic account for roughly 25–35% of heat loss.
- Walls account for approximately 25%.
- Windows and doors together account for around 25–30%.
- Floors and foundations contribute the remaining heat loss.
Air leakage through gaps, cracks, and penetrations — around electrical outlets, plumbing pipes, and attic hatches — can be responsible for as much as a third of total heating and cooling energy use. This is why insulation and air sealing must be addressed together.
Insulation Alone Won't Stop Air Leaks
Fluffy insulation materials like batts and blown-in cellulose slow heat conduction but do very little to stop moving air. If gaps and cracks aren't sealed first, air will simply flow around the insulation. Always air-seal penetrations, attic bypasses, and gaps before adding insulation layers for best results.
A professional energy audit, which uses tools like a blower door test to measure actual air leakage, can pinpoint exactly where your home is losing the most energy. Many utility companies offer subsidized or free audits — contact yours to ask.
Attic, Wall, and Basement Insulation Priorities
Attic: Hot air rises, so the attic is usually the highest-priority area. Adding blown-in insulation over existing attic floor material is one of the most cost-effective improvements a homeowner can make. Before adding insulation, seal all air bypasses — gaps around light fixtures, plumbing chases, and top plates — with caulk or foam.
Walls: In existing homes, wall cavities are harder to insulate without opening drywall. Blown-in insulation can be added through small holes drilled from the exterior (then patched), making it a viable option during re-siding projects. New construction or major renovations allow for batt or spray foam installation.
Basement and crawl space: Insulating basement walls (rather than the ceiling above) keeps pipes from freezing and extends the thermal envelope. Rigid foam or mineral wool on interior basement walls are common approaches. Crawl spaces may be insulated at the floor above or — if the crawl space is conditioned — at the walls. Moisture management is critical in both areas; insulation should never trap moisture against wood framing.
For a realistic sense of what these projects cost, our guide to estimating renovation costs accurately explains common budget pitfalls to avoid.
Vapor Barriers Depend on Climate
In cold climates, a vapor retarder is typically installed on the warm side of insulation (facing indoors) to prevent moisture from condensing inside the wall cavity. In hot, humid climates, the placement may differ. Incorrect vapor barrier placement can trap moisture and lead to mold or rot. Check guidance specific to your climate zone before installing.
When to DIY and When to Call a Professional
Several insulation tasks are genuinely beginner-friendly. Adding fiberglass batts to an accessible attic floor, installing rigid foam on interior basement walls, and topping up existing attic insulation with blown-in material (rental machines are widely available at hardware stores) are all manageable for a careful DIYer following manufacturer instructions and safety guidelines.
However, some situations require a licensed professional:
- Any spray foam application involving two-component chemical systems
- Insulating near knob-and-tube or other aging electrical wiring — do not cover old wiring with insulation without an electrician's assessment. See our overview of your home electrical panel to better understand your system.
- Insulating around chimneys, flues, or gas appliances — clearance and fire-safety requirements must be followed precisely
- Work requiring permits, which varies by jurisdiction; always verify with your local building department
When in doubt, getting a professional assessment before starting is far less costly than correcting a safety issue after the fact.
Never Cover Old Knob-and-Tube Wiring
Covering knob-and-tube wiring with insulation is a fire hazard and is prohibited by most building codes. If your home was built before the 1950s, have an electrician inspect the wiring before adding any insulation in walls or attic spaces. This is a non-negotiable safety step.
This article is for general informational and educational purposes only. Costs, code requirements, and material performance vary by region and home condition. Always verify local building codes and consult qualified professionals for electrical, gas, or structural work before proceeding.

Home & Garden Editorial Team
Home & Garden Editorial Team is the collective byline for our editorial team and contributor network. Articles published under this byline or an editorial pen name are researched, written, and reviewed according to our editorial standards for clarity, consistency, and independence before publication.
View author profile